Knowing how to protect your toes when hiking downhill is extremely important. Not doing so, or doing so in a wrong way can lead to severe pain or even toenail loss.
- Wear hiking boots that are 1/2 a size larger
- Ensure to break-in your new shoes
- Wear two pairs of socks
- Learn the right lacing techniques
- Re-tie your boots periodically
- Cut your toenails so that they are straight
- Make sure your boots have good arch support
- Extra insoles are always handy
- Pack extra pairs of socks
- Get a high-quality insole that keeps your foot in place
- Use a hiking or trekking pole
- Pack a toenail clipper in your bag
- Walk down in a zig-zag manner
- Use foot powder
- Allow your feet to get some fresh air once in a while
- Pack fewer items in your backpack
Let’s learn more about how to properly protect our toes!
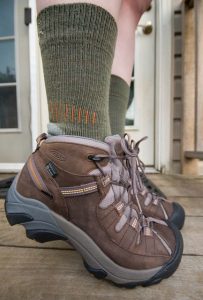
- 1. Wear the right boots
- 2. Break-in your new shoes
- 3. Lace your boots properly
- 4. Re-tie your laces periodically
- 5. Have good arch support at all times
- 6. Have a high-quality insole
- 7. Always pack extra insoles
- 8. Wear the right socks
- 9. Pack extra pairs of socks
- 10. Cut your toenails
- 11. Pack a toenail clipper in your bag
- 12. Get hiking/trekking poles
- 13. Use foot powder
- 14. Try to walk down in a zig-zag pattern
- 15. Take breaks
- 16. Pack less
1. Wear the right boots
I’ll talk more about how to customize your current boots to make them suitable for when you are hiking downhill later, but if you’re looking to get a new pair of boots, taking a read at this tip here will give you a good idea of what to look for.
When hiking, there are many factors that you need to carefully look at before choosing a pair of boots that will accompany you on all of your hikes.
If you plan to carry lots of extra weight with you, it’s definitely a good idea to pick up a pair of sturdy boots.
Even if you aren’t carrying lots of weight, risking wearing shoes for light hiking or trail running will not be the best idea as they will likely damage your toes when going downhill due to their poor arch support.
I’ll get more into this a bit later into the article, but when selecting your shoe you need to make sure that it has good arch support, or otherwise, your foot will be forced to slip forward causing toe damage.
The key to proper boot fit is ensuring that your heel sits tightly in the back of the boot, whereas your toes have some room to wiggle up in the front.
To make things short, when choosing a pair of hiking boots you want to make sure they meet all of the following demands, or otherwise, your toes may not be protected:
- They are 1/2 a size larger than your standard size: This helps protect your toes as it reduces friction and allows your toes to have space upfront.
- They are not too tight: Having boots that are too tight can cause your toes to get curled up, and likely get smashed as a result, especially if you have wide feet.
- They are not meant for light hiking or trail running: Make sure your boots can support the extra weight, and have proper liners with good arch support.
Another quick tip I always follow before buying a new pair of hiking boots is that I try to recreate the hiking conditions as much as possible for when I try on the boots.
Basically, what I mean by this is that I usually always buy new boots in the afternoon after my feet are tired. I purposefully try to tire my feet off that day so that it can feel as if I was hiking for a while.
When you do this, this helps you be prepared for the real situation of when you are actually hiking, and this way you know for a fact if the boots will help make you more comfortable while hiking.
My article on proven shoes that protect your toes gives you further details on the products tabulated below:
Table could not be displayed.2. Break-in your new shoes
If you’ve worn your shoes for a while already you probably don’t have to worry about this since you’ve naturally done it, but if you just got a fresh new pair of hiking boots, listen in closely.
It’s always a good idea to break in your new shoes as it will help your foot get used to them and this will greatly help you protect your toes while hiking.
Breaking in your shoes is extremely simple.
Just make sure to wear them wherever you go, whether that is around your house, running errands, walking around in the neighborhood, shopping, etc.
Keep wearing them until your feet start to hurt. After your feet begin to hurt, take off the shoes, and allow your feet to rest.
Repeat the above process several times.
With each time, your foot will get more and more used to the boots, and eventually, you will feel no pain.
As soon as this happens, that means that you will be ready to hike.
Quick warning: Even after breaking them in, the boots may still have spots where you may experience pain. Make sure to take note of these hot spots so that you can alleviate them before hiking by wearing socks.
3. Lace your boots properly
Even if you chose the right boot, got the right insoles, and did everything right so far, lacing your boots improperly can make all of your efforts worthless.
Improper lacing can make your foot slide forward, and as you may know, this can greatly damage your toes or lead to toenail loss.
There are tons of lacing techniques out there, it usually depends on the type of boot you have, but some lacing techniques I would recommend are:
- Double overhand knot
- Surgeon’s knot
If you want to get a bit fancier, try out some of the techniques above, but otherwise, just know that to protect your toes when hiking downhill you should just try to tie your boots in such a manner so that your foot stays in place and does not move around a lot.
4. Re-tie your laces periodically
Even if you have the best knot before leaving to go hiking, as time passes, that knot will get loose, causing you to put your toes in danger.
Make sure you don’t just watch the YouTube video once, but watch it a few times and actually memorize how to tie a good knot.
If you feel your foot sliding a bit more than usual, simply stop your hike, re-tie your laces and move on.
This will ensure that your foot is always held in place, and as a result, will protect your toes at all times.
5. Have good arch support at all times
We need to make sure our toes are as protected as possible, and one key way we can do this is by making sure we have good arch support at all times.
Don’t get tricked, though, as most hiking boots start off having good arch support, but as time goes on it flattens and this causes the shoe to feel tighter. If you are planning to get yourself a pair of hiking shoes, especially with a toebox check out our article on shoes that protect toes when hiking downhill.
Having a tight shoe is a big no-no, as this can increase friction and make your foot more likely to slide forward leading to toe damage.
If you really like a pair of boots but are worried that they may not have good arch support, then try replacing the insole of the shoe.
6. Have a high-quality insole
This ties in with the previous tip, as having a high-quality insole means that it will always provide good arch support for you.
Also, make sure to look for insoles that offer a higher arch, as this will help hold your heel in place.
You know you have a good insole if it provides you good arch support, and keeps your foot in place so that it doesn’t slide around too much.
If you wanna know my absolute favorite, I’ve got to give that honor to SoulInsole.
Their insoles are just amazing! They provide a lot more cushioning and support than most insoles, and also help soak up some interior space for boots that are slightly wide like mine.
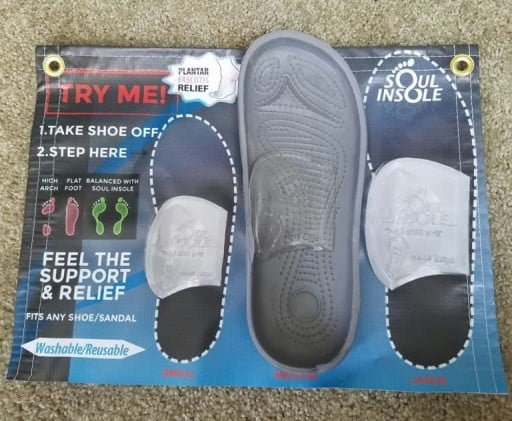
You can get your insole here:
Soul Insole – High quality insole
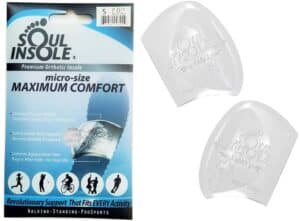
7. Always pack extra insoles
If you’re ever out in the middle of nowhere and feel that your arch support may have gone flat, it’s always good to be able to change your insole.
Risking having flat arch support is pretty much like having low-quality hiking boots, and as a result, you may get extreme toe damage or even toenail loss.
Just take out one of these guys, swap him out with your old insole, and there you go. Good as new!
8. Wear the right socks
So I assume you’ve got the right boots, packed some insoles, and done everything above right so far.
Well, there’s actually another crucial thing you need to do if you want full protection of your toes for when you are hiking downhill.
One thing is wearing the right socks, and another thing is wearing them the right way.
Let’s start with wearing the right socks.
Whatever you do, do not wear cotton socks while hiking.
Cotton just absorbs and collects sweat, and it dries very slowly. The last thing you want to be doing is hiking around with soggy socks and boots.
Not only is it uncomfortable to walk around with soggy socks and boots, but this can also increase the chance of you getting a blister.
Now, let’s look into how we can wear these socks properly. In order to protect my toes when hiking downhill, I usually wear two pairs of socks.
The first pair or the one that makes direct contact with your bare foot is known as an “inner” sock.
Here’s a little bonus for you: try wearing them inside out!
Wearing them inside out helps out a lot because sometimes the stitching in the toes of the socks can rub against your toenails, causing severe pain or toenail loss.
Now for the second pair or the one that makes contact with your boot, it is known as an “outer” sock.
They are mainly there to reduce friction by serving as a cushion between your foot and boot.
If you like, you can also wear these insides out, as it also does help a little bit with reducing moisture by absorbing it from the inner sock.
Overall, having two pairs of socks greatly reduces the friction between your foot and boot, and is one of the best ways to protect your toes when hiking downhill.
9. Pack extra pairs of socks
Just like with everything important, it’s always good to pack extra of it so that you can be prepared if things ever go south.
In case something happens, make sure to always have an extra pair of socks so that you can quickly change and keep hiking safely downhill.
10. Cut your toenails
When cutting your toenails, you probably don’t pay much attention to how you cut them, since you aren’t straining your feet too much.
However, when you are hiking, there is a specific way you need to cut your toenails that I am about to reveal to you below.
Cutting your toenails improperly can not only put you at risk of toe damage or even toenail loss but also it can increase the risk of an ingrown toenail.
Before leaving to go hiking, make sure that your toenails:
- Are not too long: Having long toenails can cause your boots to press into your nails. This can be extremely painful.
- Are cut straight: Instead of the usually rounded cut, clip your toenails straight. This reduces friction between your toenail and your skin. Do not cut them too short.
- Are cut by a clipper made specifically for toenails: Toenail clippers cut straighter and will keep your toenails more protected than with a nail clipper.
Here’s a quick tutorial from Wikihow on how to cut your toenails properly.
11. Pack a toenail clipper in your bag
Whether we like it or not, our nails grow all the time, so packing a toenail clipper with you could potentially be a lifesaver.
Not only can it help you if you feel a bit of discomfort down there, but it could also be useful to some of your friends in case they forgot to clip their toenails.
Who knows what the scenario may be, but if you know me, I always like to stay prepared for whatever happens, so you’ll always see me having one of these bad boys in my backpack.
12. Get hiking/trekking poles
Though hiking/trekking poles don’t directly help you protect your toes when hiking downhill, they can be quite helpful.
They vastly reduce the force with which you hit the ground, and as a result, make the process of hiking downhill a lot easier on your toes.
Though quality trekking poles cost a lot, I really do think they are must-haves and you should invest in them.
13. Use foot powder
This is an interesting one, I bet many people haven’t ever heard of foot powder! Well, one of my friends recommended it to me and it was amazing.
What foot powder does is that it helps get rid of friction. Your feet are constantly rubbing against your socks and shoes. Also, your toes are constantly rubbing against each other.
This rubbing could be very painful and will eventually produce blisters.
Just put some foot powder in your socks before you put them on and you’re good to go.
14. Try to walk down in a zig-zag pattern
Walking down in a zig-zag pattern combined with the right trekking pole will pretty much guarantee your toes’ safety.
It might take a bit longer, but not only is it safer to hike downhill in a zig-zag pattern, but it also reduces tons of friction and will greatly lessen the chance of getting toe damage or losing a toenail.
And it also helps in relieving knee pain while hiking downhill. For more details on this, you can see my article on knee braces.
15. Take breaks
After all, hiking is all about enjoying the beautiful scenery and having fun.
If you feel your feet getting strained, simply let them have some fresh air by stopping and taking off your shoes and socks!
This will keep your toes nice and relaxed, and greatly increase the chance that when you’re home you don’t feel any pain after your long hike.
16. Pack less
I recommend bringing as little things as you can in your backpack during hiking or backpacking since more weight will put more strain on your toes.
I wish you a fun hike now that you know how to protect your toes!
Sean is an accomplished backpacker with over 10 years of experience exploring the great outdoors. He has a passion for hiking, camping and off-grid living.